Sunday, December 22, 2013

Holiday Turkey - Dry Brined and Butter Roasted


Is it just me, or did Christmas sneak up on us this year? Thanks giving was late, then I was sick, then I was at Disneyland for a week. It's all good, but I am playing catch-up now.

We had several new dishes for our Thanksgiving celebration and I've been meaning to get them posted in case any of you need inspiration for your Holiday Table.  I have never brined a turkey before and I wanted to try it this year. In the past, we've always used those oven roasting bags because they can really make for a lot of gravy. This is a HIGH priority for my father-in-law. But, because he went to visit his brother in Arizona, we were free to experiment.

After reading several articles on the different methods and flavor combinations available, I decided to do a dry brine. The consensus seems to be that dry brining offers better texture for the finished product. Also, it seems a whole lot easier. No purchasing a 5 gallon food-safe bucket. No monitoring ice and water temperature. Just mash up some stuff. Mash it in to your turkey. Wrap it. Store it. Rinse it. Roast it. Easy Peasy.

I used a method offered by Honestly Yum, however, I altered the flavor components for my preferences.
 The supporting cast, in order of appearance:
Rainbow Pepper corns
Dried Garden Sage
Satsuma Mandarins
Meyer Lemons
Bay Leaves
Kosher Salt
Dried Onions
Garlic Powder
Fresh Garden Parsley
Fresh Garden Thyme
Fresh Garden Rosemary

 The citrus zest features in the brine rub while the juicy fruit was used to stuff the cavity.

 Everything goes in the food processor and is combined. This smells like savory, herby heaven!

Holiday Turkey - Dry Brined and Butter Roasted
1 Turkey, 15-18 pounds
3 tbsp. Rainbow Pepper corns
Zest of 2 Satsuma Mandarins or oranges (reserve fruit)
Zest of 2 Meyer Lemons or other type of lemon (reserve fruit)
5 Bay Leaves
1/2 cup Kosher Salt
2 tbsp. Dried Onions
1 tsp. Garlic Powder or granulated garlic
6 Sprigs Fresh Parsley
2 Sprigs Fresh or dried Sage - about 2 Tbsp.
6 Twigs Fresh Thyme
2 Twigs Fresh Rosemary
1/2 cup softened butter

Place every thing but the turkey and butter in the bowl of a food processor and pulse until everything in about like sand.

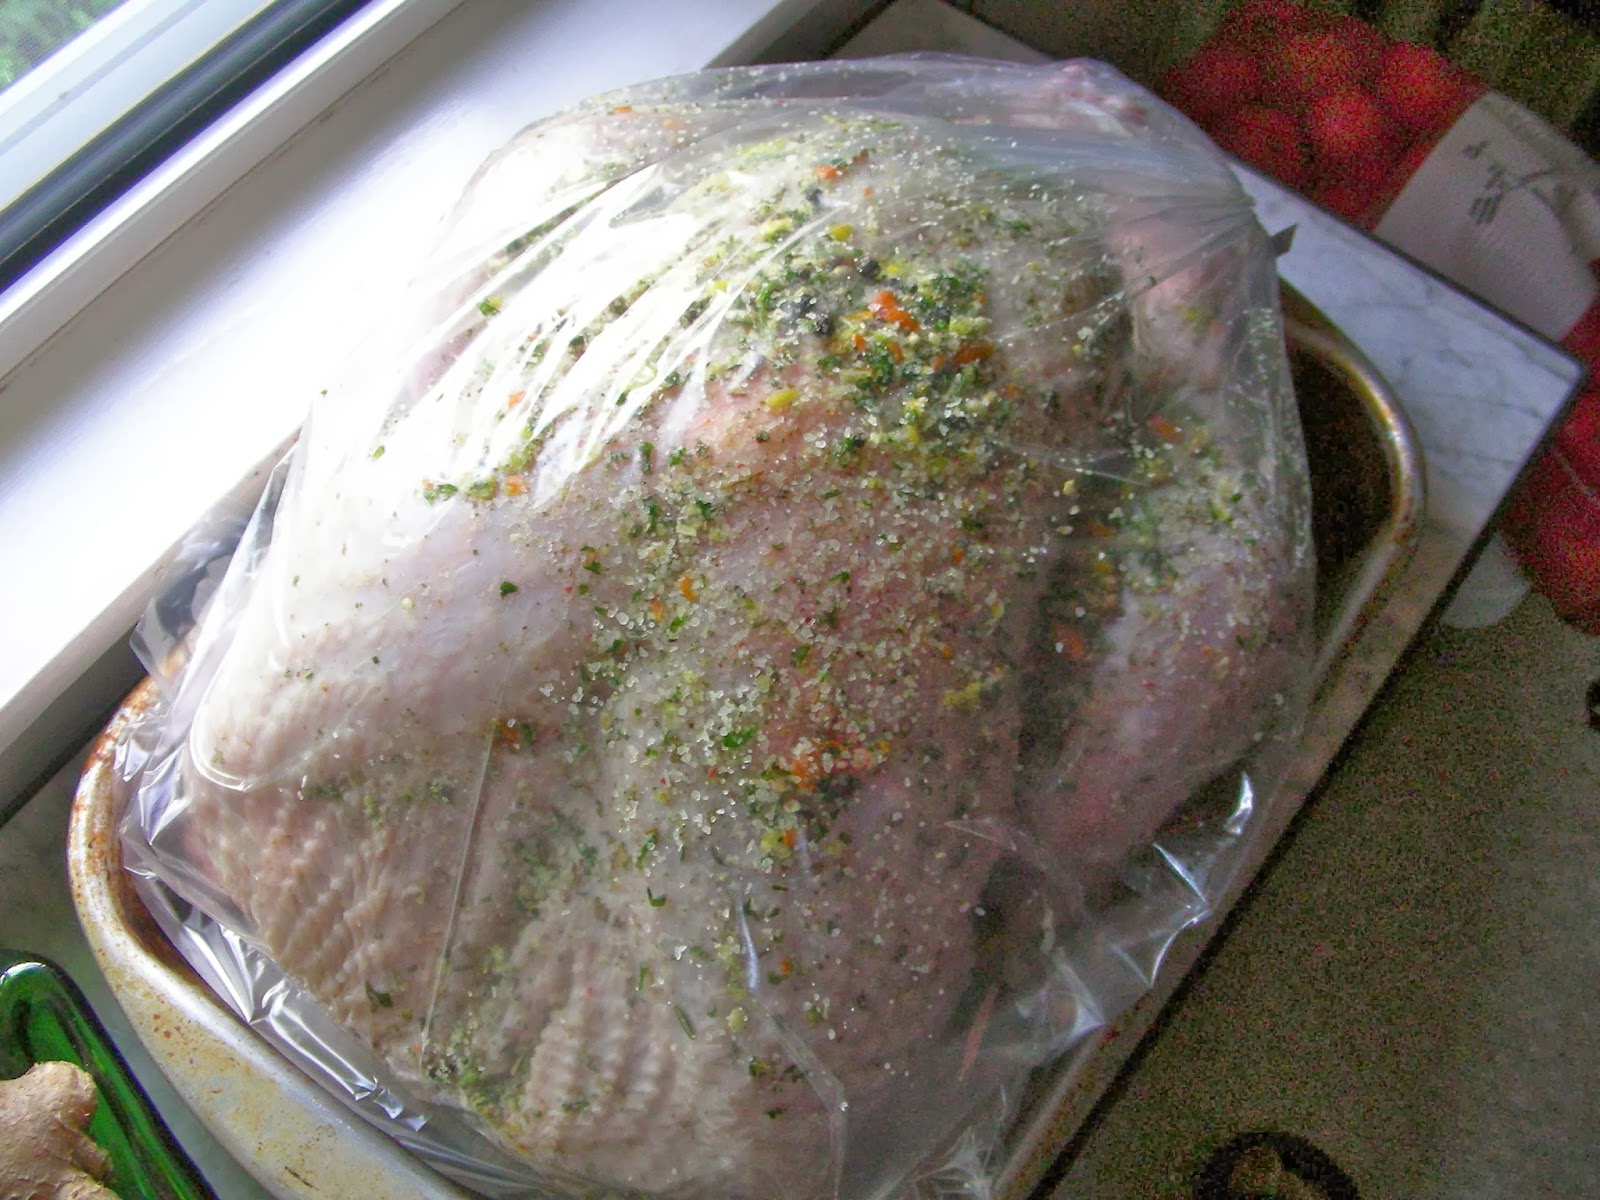
Remove the neck and giblets from the turkey's cavities. Wash thoroughly, inside and out. Remove any pin feathers. Dry as completely as possible with paper towels. Rub the spice mix all over the inside and the outside of the bird. Pile any extras right on top. Carefully place the turkey in either an oven roasting or a large zip lock bag designed to hold a turkey. Place on a pan or platter and place in the fridge. Brine one day breast up and the next day, breast down. (Reserve the giblets for the stuffing recipe TBA.)


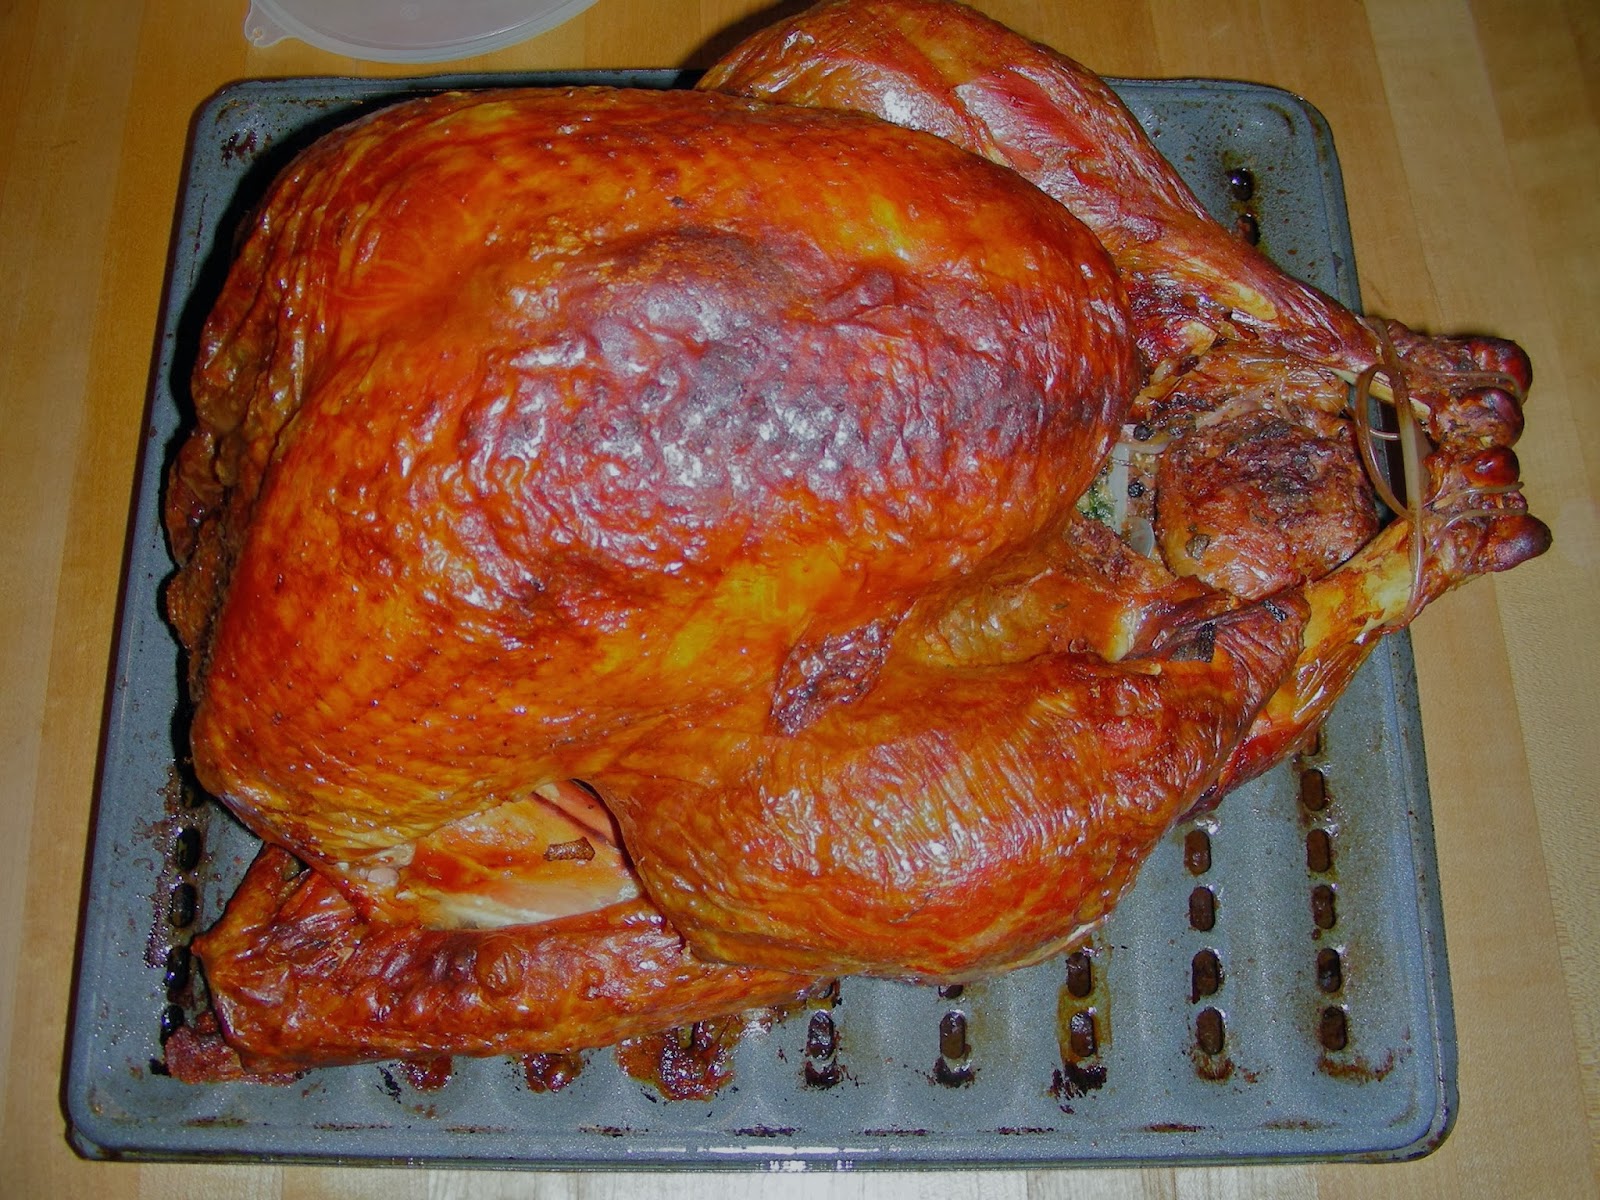
When ready to cook, remove the turkey from the bag and rinse all the salt and herbs off, inside and out. Preheat oven to 400 degrees. Dry the turkey and rub the softened butter all over. Stuff the cavity with additional herbs, garlic, onion and the remaining citrus fruit, quartered. Place, breast up, on a roasting pan or a broiler pan. This allows the juices and fat to melt off and be saved for gravy. Place the turkey, leg end first, into your oven. Cook at 400 degrees for 1 hour. This will make the skin very crisp and will seal the juices into the turkey. Reduce heat to 325 and continue to roast until the internal temperature measures 165 degrees in the thickest part of the thigh. If you have a thermometer that will alert you when this temp is reached, that is ideal. I had a 17 pound bird and it took an additional 2 1/2 hours for me. 

Remove from the oven, tent with foil and allow to rest for 20 to 30 minutes and then carve. 

For gravy, pour any pan drippings into a sauce pan. Bring to a boil and add a slurry of 1 tbsp. cornstarch mixed into 1/4 cup cold water. There was not much fat in my drippings and most of that appeared to be butter, so I didn't skim. Whisk and cook to desired thickness. This more akin to a velvety butter sauce than traditional flour based gravy. Super yum!

Save the bones for soup! Enjoy!

We wish you a Merry Christmas and a Happy New Year!

Saturday, November 30, 2013

Using Meyer Lemon and Pineapple Marmalade - Cookie Bars and Pie!

 Miss Madelyn and Meyer Lemon Pie

My neighborhood is beautiful right now. Most of the leaves have fallen and the Sun is shining through to warm the ground, even on chilly days. The winter garden is humming along and contributed a butternut squash and collards for our Thanksgiving table. One of the splendid things about California winters is citrus. Delicious, wonderful, spectacular citrus. I learned to make marmalade a couple of winters ago and I've finally used up all those experiments. Now it's time to make some more! 

One of my favorites is Meyer Lemon and Pineapple Marmalade. I have a little dwarf Meyer Lemon in a pot on my back patio and I'll get about two dozen. I was lucky enough to receive a big bag of them from a work friend a couple of weeks ago. I'm so happy to share the results when people share their fruit. With this great bounty, I've made one batch of marmalade, a batch of yummy cookie bars and a cream pie. 

When I'm not cooking, I'm teaching county employees about administering social services programs. My lemon-benefactor is a student in my most recent class. (Thanks, Graciela!) Because we had so many chats about the marmalade, I wanted to be able to give everyone in class a taste. These cookie bars came to mind. They are based on this recipe for Orange Marmalade Bars. This cookie base is just great. I've used several kinds of jams and toppings. Just use the crust recipe and top with a half-pint jar of your favorite marmalade or jam and top with a suitable topping. I used shredded coconut with the Meyer Lemon and Pineapple Marmalade. Perfecto!


This Meyer Lemon and Pineapple pie was inspired by Sarah over at Undercover Caterer. Her Nana used to make this Lime Pie. It looked so good and I had so many lemons, I decided to try it out with them instead of limes. I used a pre-baked pie shell from this recipe. (Somehow, my crust developed to make three crusts. Two bottoms and a top.) I made the filling as instructed by Sarah, but the filling was a little soft. I was concerned that there wasn't enough acidity in the Meyer Lemon juice to cause the sweetened condensed milk to get firm. I ended up adding half a small carton on mascarpone cheese in the filling and whipped the rest into the whipped cream later. Because I had some lemon and pineapple marmalade on hand, I used it to decorate the top. It is very rich, but delicious! I will be making this one again!

Meyer Lemon and Pineapple Pie (Thanks to Sarah's Nana!)
1 prepared pie crust
1 can sweetened condensed milk
grated zest of two Meyer Lemons
1/2 cup Meyer Lemon juice
Pinch of salt
1 cup crushed pineapple, squeezed dry
1 8 oz. carton of mascarpone cheese
1 cup heavy whipping cream
1/3 cup powdered sugar
1/2 tsp. vanilla extract

Add the milk, zest, juice, 1/2 of the mascarpone and salt. Whisk until well blended. Add in the pineapple. Continue to whisk until the filling thickens. Scrape into the prepared crust and chill. The pie will continue to set as it chills. For serving, whip the heavy cream until it begins to thicken. Add the remaining mascarpone in several spoonfuls, allowing the mascarpone to incorporate. Whip in the powdered sugar and vanilla. Spread on top of the filling and decorate with additional lemon zest and lemon marmalade, if you have it.


Saturday, September 14, 2013

Random Food Fridays - Greens, Cherry Tomatoes and Brats


Last weekend, I had a great time visiting with my beautiful daughter, Madelyn. When we are running around the Bay Area, we don't waste any meals on food that is not exciting. When we are running around Sacramento, we always head for Little Saigon for Vietnamese food. (One of those non-Dwayne foods.) Well, after a weekend of dining out, no matter how lovely, my body was hungry for something simple, fresh and homemade. I really didn't have a plan for making this, I just kept using things I found in my fridge. When I sat down to eat, I was surprised at how absolutely delicious this simple dish turned out to be. I think part of the credit must go to the Magical Miss Pauline, gardener extraordinaire. She brought me a bunch of veggie gifts when she visited the weekend before and I'm still trying to use them all. The kale and collards are from her garden and the cherry tomatoes are from my garden. The addition of sun dried tomatoes, packed in olive oil, added another depth of flavor. Mr. Dwayne also loved this dish and I will be making again, as long as the cherry tomatoes keep coming!


Greens, Cherry Tomatoes and Brats
1 tbsp. olive oil
1/2 cup diced shallots
1 large clove garlic, minced
1 fully cooked bratwurst, cut into 1/2 inch dice (mine was leftover)
1 pint mixed cherry tomatoes
1/4 cup julienne sun dried tomatoes in their oil
4 cups cleaned and chopped mixed hardy greens  (I used kale and collards)
2 tbsp. water
Salt and pepper

Heat the olive oil in a large skillet over a medium-low flame. Add the shallot, garlic, diced brat, cherry tomatoes and sun dried tomatoes. Cover and cook, stirring frequently, until the cherry tomatoes pop and release their juices. (You can help them to pop.) Add the greens and the water. Stir to combine and cover. Continue to cook, stirring occasionally, until the greens are tender to your liking. This served two at my house. We had it along side a beautiful baked potato, also from Miss Pauline's garden. Enjoy!

Tuesday, August 13, 2013

Pineapple Tomato Salsa - Success!


In August of 2011, I did my best to create a pineapple/tomato salsa that would be very close to Trader Joe's. I could not find ANY recipe online that included pineapple and tomato and was suitable for canning, so I improvised. There are many recipes for fresh fruit and tomato salsa, but nothing for canning. I was only moderately pleased with that recipe. When some friends brought me a big bag of garden tomatoes, I knew I had a second chance to get this right. Guess what? I think I did. This is so good!

I took this salsa on a camping trip last weekend and it was very well received and quickly disappeared. While my new version is spicier than Trader Joe's, my tasters agreed that it was not too spicy and could even have been hotter. I think it is just right for me. I had to add a shot of Tapatio to my previous version. If you want a milder salsa, reduce the chipotle.

Many kinds of tomatoes make a colorful salsa!

I'm so excited to share this with you. I've put up 6 pint jars and plan to make more ASAP. I hope you try it.

Pineapple and Tomato Salsa
6 cups tomatoes, cored and diced (Any kind - Sungold cherry tomatoes are a nice touch)
1 7 oz. can fire roasted diced green chilies
1 fresh jalapeno, seeds and ribs removed and diced small
1 canned chipotle, diced, plus enough of the adobo sauce to equal 1/4 cup
1/4 cup tomato paste (I used the kind from a tube)
2 cups diced yellow onion
4 cloves garlic, diced 
2 20 oz. cans crushed pineapple with juice
3 tbsp. brown sugar
1 tbsp. kosher salt
2 tbsp. cider vinegar
1/4 cup fresh lime juice
1/2 cup chopped cilantro

Prepare 6 wide mouth pint jars, rings and lids and the boiling water bath for canning.

Combine all ingredients except the cilantro in a large sauce pot. Bring to a boil and simmer until desired consistency is reached, stirring frequently. Mine took about 40 minutes. Taste and adjust seasoning. Add the fresh cilantro and stir through. Carefully ladle into jars leaving 1/2 inch head space. Use a knife or chop stick to poke down into the jar along the edges to release air bubbles. Wipe rims with a damp cloth and cover with lids and rings. Process in the boiling water bath for 15 minutes, beginning timing from when the water returns to a full boil. Turn off heat and allow the jars to remain in the water for 5 minutes before carefully removing to a towel lined tray. Allow the jars to sit undisturbed overnight. Check for seals and label.


Friday, August 2, 2013

Chai Peach Jam made with Custom Chai Blend


I confess - brown is not may favorite color for jam. It is a perfectly fine color for many delicious foods, but jam? I just don't know. This glossy brown jam compensates for its suspect appearance by packing a giant wallop of flavor. And, it's not just any flavor. It is Custom Chai flavor. Boom!


I made my first batch of chai in May, when I planned a special Super Surprise Birthday for my sister-friend, Miss Paula. (One of the really surprising things is that her actual birthday is in December.) The chai we had for her special breakfast was yummy, but I ended up putting a couple of big slices of orange zest in with the chai while it was simmering. This time, I decided to dry the zest and add it to the mix from the start. Summers in Sacramento can be scorching. I set these pieces of orange zest out in the morning and by afternoon they were completely dry. I set them in the sun with a baking rack and light cloth over the top. There are a lot of birds in my backyard! After this photo, I also added finely chopped fresh ginger. It was also dry within a few hours. If you do not want to make or purchase dry ginger pieces, you can use Ginger People Ginger Chips.


Brian and Rosie dropped a large paper bag full of tree-ripened peaches on my porch last weekend. A big brown bag is a lot of fruit. Just so you  know - A LOT! These peaches made four batches of jam using four pounds of prepared fruit in each! I had a similar experience with plums earlier this summer. I thought I would never get to the end of those plums! When there is a lot of fruit, I often search my sensory memory for tasty and safe flavor enhancements. This chai came to mind as a great match for peaches.


The nice thing about making your own chai is that you can alter it to fit your own tastes. I tweaked mine with the addition of orange peel, chopped vanilla beans and allspice. You might make this two or three times before you get it just right, but it's never bad and will never be wasted. I'm also thinking this would make a great holiday gift, if I ever need to give away something besides jam!


To prepare the peaches, bring a very large pot of water to boil with about 2 inches of space left at the top. Prepare a similarly large bowl with ice water. Cut a small X in the bottom of each peach. Drop them, a few at a time, into the boiling water and time them for one minute. Scoop them out and place them directly in the ice water bath. Now, put the next set of peaches into the water and repeat. Place the cooled peaches into bake pans as you remove them from the ice bath. If you start at the X end, the skins should slip right off. You may want to peel them over a strainer so that you can catch the rosy juice that drips off and add it back into the fruit. Once the pits are removed (an easy job with free-stone peaches like these) chop them roughly and measure 4 pounds of prepared fruit per batch. Place the measured fruit into a 9 x 13 inch bake pan and add 1/4 cup lemon juice. Mash with a potato masher until there are smallish pieces and some of the juice is released. Mix the prepared fruit with 4 cups sugar, cover with plastic wrap and allow to macerate before making the jam. I started this fruit on a Sunday and finished the final round of Jam on Thursday night.

Here is my chai blend with the dried orange zest and ginger added. Mix and store in an air tight container. Here's a tip - find your nearest Indian food store and buy spices there. Super cheap and good!


I made two batches of the jam with just the peaches and it turned out great. The next two batches were flavored with this chai sachet. You can use a metal tea ball, if you have one large enough. After the tea ball incident with the Cardamom and Pepper Plum Jam, I decided not to risk it and used cheese cloth. I used three folds worth of packaged cheese cloth, opened it up and folded it in half so that I had a two layer square. I placed the cheese cloth in a bowl and filled it with 1/2 cup of the chai blend.

To tie the bundle, bring up two of the diagonally opposite corners and tie into a knot.

 To finish, bring up the other two corners and tie into a knot. If there seems to be some extra, wrap the ends of the cloth around the knots and tie another knot. Your chai is now secure!

Peach....Chai Peach #1....Chai Peach #2

This jam is an example of how the smallest variables can make a big difference. The first batch of chai peach was made in a very large 8 quart pan with an 11 1/2 inch diameter opening. The second batch was made in my smaller large sauce pan, which has a 10 inch diameter opening. At first I couldn't figure out why the second batch got so much darker before it came to the right consistency. Then, I realized it was because the evaporation took longer and the chai had more time to infuse the jam. They both taste great, but I think Chai Peach #1 is more attractive. (Less brown.)

I think that the tannins in the black tea compliment the peaches nicely. Really fresh, tree-ripened peaches have an astringent after-taste that is reminiscent of the tannins in tea. If you don't want that little bit of bite in your jam, you can use the chai spices without using the black tea in the mix.

Chai Peach Jam
4 lbs. fresh peaches
4 cups sugar
1/4 cup lemon juice
2/3 cup apple pectin (or, one green apple, peeled, cored and chopped)
1/2 cup dry chai blend

Prepare the peaches as described above and refrigerate until ready to cook. Prepare 8 half-pint jars and lids and a boiling water bath. Place several spoons and saucers in the freezer.

Place the macerated fruit into a large pot and add the apple pectin or apple pieces. Bring to a boil. Add the chai sachet and continue to simmer until the jam starts to thicken and the foam subsides. Stir frequently, especially as the jam thickens. If you squish the chai sachet with the back of your spoon periodically, it will release more flavor. When the jam is glossy and thick, scoop a bit out with one of the spoons from the freezer and put the spoon back in the freezer on a saucer. Check the spoon in about two minutes. If it runs off the spoon easily and flattens on the saucer, cook more. When the jam plops off the frozen spoon and wrinkles when you push it across the saucer, it is ready. Remove the chai sachet and remove the jam from the heat. Skim any remaining foam. Carefully ladle into the prepare jars, wipe the rims and top with the prepared lids and rings. Process in the boiling water bath for 10 minutes. Carefully remove to a towel lined tray and allow to cool. Makes 7 or 8 half-pint jars.

Custom Chai Blend
2 cups loose leaf orange pekoe tea
1/2 cup whole green cardamom pods
1/2 cup broken cinnamon stick pieces
2 tbsp. whole cloves
1 tbsp. fennel seed
1 tbsp. whole rainbow pepper corns
1 tbsp. whole allspice
2 vanilla beans, chopped
dried orange zest from two oranges (organic! No wax needed here.)
1/3 cup chopped and dried fresh ginger or 1/2 cup Ginger Chips

Combine all and store in an air tight container.

To make chai:
Bring 1 1/2 cups water to a boil. Add 1/2 cup of the chai blend. Simmer about 10 minutes. Add 2 tbsp. honey (or sweetener of your choice) and strain. This is very concentrated and can be stored in the fridge to make individual cups of chai. To make the whole thing, warm 4 cups milk and add the entire batch of chai concentrate. Serve warm or cold.

Mmmmmm...chai....

Sunday, July 21, 2013

Cardamom & Pepper Plum Jam plus Almond Jam Tart


Plums of every kind are abundant in California. I have seldom paid for a plum in my life time. My parents have several trees with little wild golden plums. Another friend has a stately Santa Rosa plum that dominates his backyard, and yet another friend has an elderly gentleman neighbor who is very happy to exchange plums for a few jars of jam. Like all stone fruits, plums come in high summer, when the heat is really oppressive and close to dangerous. These plums arrived in the midst of a heat wave a few weeks ago where the indoor temp of the house got up to 93 degrees! We usually do quite well without AC because the Delta breezes come in the evening and cool everything right down. That heat wave was made worse by nighttime temps that stayed in the 80's. All of this is just to explain why I had a freezer full of plums. It was getting pretty ridiculous. We couldn't even get at the ice trays without a major operation. So, while Mr. Dwayne was at Comic Con this week, I planned to cook those plums and make some room in the freezer. It has still been pretty hot, but the pleasant nights have made up for any heat accumulated during the day.


 After three batches (24 half-pint jars!) of my old standby, plum and pineapple, I just had to do something different. I followed my nose to the spice cabinet and found that cardamom and rainbow pepper made a unique and plum-friendly blend. My plan was to take the spices, bash them up a bit and put them in a tea ball to infuse the jam. My plan when awry when the tea ball burst open towards the end of cooking. No one wants to bite into a cardamom pod. I whipped out my handy food mill and put the mixture through, capturing all the bits and pieces. The only disappointment is that this process also removed the skins. But, the beautiful color and tartness of the skins had already been infused into the jam. So, if you choose to do this, you can do it either way - cook and strain or use a strainer that works. A cheese cloth bundle would also work.


 In the finished product, the cardamom is forward in a nice way. The pepper is very subtle. I really wanted that pepper corn aroma more than heat. I used 1 tbsp. of each. I think that next time, I would reduce the cardamom a little and increase the pepper. But, if you want to just flavor with cardamom, 1 tbsp. is a good amount. Please use good green pods and crack them just before cooking. Powder will just not work for this purpose.


As usual, I had a bit left over and I was heading out to a dessert potluck in the evening. This was a very successful experiment. It is puff pastry, an almond paste custard, dollops of jam and then toasted sliced almonds. Very impressive. Not much effort.


You could make this tart with any jam, but be sure to use a very tart jam to offset the rich, sweet custard.

A beautiful reward to share with friends after a long, hot day of jamming!

Cardamom & Pepper Plum Jam
3 1/2 lbs pitted and chopped plums
4 1/2 cups cane sugar
1 tbsp. rainbow or black peppercorns
1 tbsp. whole green cardamom pods
1 pkg. Sure Jell reduced sugar pectin in the pink box


Add the chopped plums to a large pot. Use a mortar and pestle or a heavy pan to bash the peppercorns and cardamom pods. Add the spices to a tea ball or cheese cloth bundle and add to the pot with the plums. Bring to a boil, stirring occasionally. Measure 1/4 of sugar from the 4 1/2 cups sugar and place in a small bowl. Stir the pectin powder into the 1/4 cup sugar. When fruit is boiling, stir in the sugar and pectin mixture. Return to a boil then add the remaining sugar. Stir until dissolved. Bring to a full rolling boil that can't be stirred down. Boil for one minute. Remove from heat. Remove tea ball. (Or, in my case, the contents!) Carefully ladle the jam into prepared jars, wipe the rim, top with lid and ring and finger tighten. Process in a boiling water bath for 10 minutes. Makes 8 to 9 half-pint jars, plus a little extra.

Almond Jam Tart
1 sheet of frozen puff pastry, thawed
1 8 oz can almond paste
2 large eggs
1/4 cup sour cream
1/2 cup tart jam, such as the plum jam above
1/4 cup sliced, toasted almonds

Preheat oven to 400 degrees. Line a large baking sheet with parchment paper. Lightly flour a clean surface and roll out the puff pastry. Carefully lift over the rolling pin and place on the parchment paper lined pan. Set aside.

Crumble the almond paste into the bowl of a mixer. Add the eggs and sour cream. Beat with the whisk attachment until the mixture is pretty smooth. Some little lumps are ok. Spread the almond mixture on the pastry dough, leaving a 1 inch border. Stir and dollop the jam on the pastry. Do not blend in, but leave distinct areas of jam. 

Bake in the preheated oven for 15 to 20 minutes. Sprinkle with the sliced toasted almonds in the last 5 minutes. Allow to cool a bit before slicing. 


Friday, July 19, 2013

Random Food Fridays - Summer Ratatouille Lasagna


I am currently enjoying my first successful garden. It's great! In fact, I love my happy plants. Each piece of produce is just a bonus. I have healthy soil, healthy plants and gigantic shade trees. Those trees are great for our comfort and budget (no AC) but, they do block the energy of the Sun. My plants get about 6 hours of direct sun a day. They would do much better with 8 or more. Still, I'm getting lots of zucchini. In fact, enough that I am getting busy figuring it out how to use it all.

Eggplant: slice, brush both sides with olive oil and season with salt and pepper. Broil, 5 minutes per side. Same for the zucchini. This removed the excess moisture and adds flavor.

I was gifted with a gorgeous home-grown eggplant by one of my coworkers. With a pile of zucchini and a big eggplant, I thought, "Hmmm, gluten free lasagna..." I am not living gluten free, but my best friend, Miss Paula is. She has been out of town and missed this experiment, but I promised to make one for her when she returns. This experiment was very successful. Although, with these ingredients, it's hard to know how you could go wrong.

This could easily be a vegetarian lasagna. I made a red sauce with turkey Italian sausages, tomatoes and mushrooms. The middle layer is ricotta mixed with an egg, chopped fresh basil and parm.


 Red sauce on bottom, then the eggplant, more sauce, ricotta and grated cheese.

 Top with zucchini, the remaining sauce and grated cheese. Bake at 400 degrees for abut 20 minutes.

 Mine is a little over browned because I didn't hear the timer go off. Still delicious.

My dinner. So good!

Summer Ratatouille Lasagna
1 tbsp. olive oil, plus additional for brushing the vegetables
1 lb. turkey Italian sausage
1/2 cup diced yellow onion
2 large closed garlic, diced
8 oz. sliced mushrooms
1 15 oz. can diced tomatoes
1 14 oz. jar of your favorite spaghetti sauce
1 pretty big eggplant
1 pretty big zucchini
1 15 oz. container ricotta
1 egg
2 tbsp. chopped fresh basil
1/4 cup Parmesan cheese, divided
8 oz. grated cheese (I used an Italian blend)

Preheat your oven's broiler on high. Wash, dry and slice the eggplant and zucchini, long ways, into 1/4 inch slices. Brush the veggies with olive oil on both sides and season with salt and pepper. I had to do the broiling in two steps - one pan of eggplant and one pan of zucchini. I broiled them for about 5 minutes on each side. Because this takes about 20 minutes, you can prepare the sauce while preparing the veggies.

For the sauce, heat 1 tbsp. olive oil in a large skillet over a medium-high heat. Remove the sausage from the casing and add to the hot pan. Add the onion, garlic and mushrooms. Cook until the sausage is done. Drain excess liquid. Add the bottled sauce and diced tomatoes. Taste for seasoning and add salt and pepper to taste. Simmer while finishing the veggies and putting together the ricotta filling.

For the ricotta filling, in a medium bowl, mix the ricotta, chopped fresh basil, egg and 2 tbsp. Parmesan cheese. Stir to combine.

After the broiling is complete, set the oven for 400 degrees on the baking setting. 

To assemble, layer the following:

1.  x 13 inch pan, greased or sprayed
2. A small amount of sauce to cover the bottom of the pan
3. Layer the cooked eggplant slices
4. Spread with the ricotta mixture
5. Spoon over half of remaining sauce
6. Sprinkle with half the grated cheese
7. Layer the cooked zucchini slices
8. Spoon over remaining sauce
9. Sprinkle with remaining grated cheese 
10. Sprinkle with 2 tbsp. Parmesan

Bake in preheated oven for 20-25 minutes. Allow to stand for 10 minutes before serving. Serves 8. 

Saturday, July 13, 2013

Random Food Fridays - Summer Squash and Sausage Saute


It is easy to eat quick, healthy and delicious food in Summer. It's especially easy when you can walk into your backyard garden and pick your dinner. So far, I have only been able to harvest squash and herbs. There are tons of green tomatoes, but nobody is ripe yet. So, for this dish, I have added farmers' market onions, sweet corn and tomatoes on the side. Oh, and there is some fully cooked, organic chicken Italian sausage too.


My backyard garden is very green and happy, but those plants sure have to make some effort to produce. I only get about 6 hours of direct sun per day. This is enough to keep plants healthy and happy, but not enough to have a lot of produce. Therefore, each squash, pumpkin and flower gets a lot of excitement and enthusiasm from me.


Mr. Dwayne enjoyed this dish thoroughly and took some leftovers for lunch. Nothing like a little sausage to help the vegetables go down!

My dinner!

Summer Squash and Sausage Saute
1 tbsp. olive oil
1 tbsp. butter
1/2 of a large yellow onion
1 pretty large zucchini
1 pretty large yellow squash
1 package fully cooked chicken sausage (I used Italian, but any you like will do)
2 ears of sweet corn
hand full of fresh basil
4 large fresh sage leaves
Salt, pepper and garlic/herb seasoning to taste

Cook the ears of sweet corn by your favorite method. I like this and it works every time. I've also done the soaked ears of corn in cold water and then grilled and shucked this way. Easy peasy. When the corn is done, cut the kernels away from the cob and set aside.

Heat the olive oil and butter in a large, heavy bottomed pan, over a medium flame. Slice the onion and add to the pan. Wash and quarter the squash length-wise then cut into slices. Slice the sausages into bit-size pieces. Add the squash and sausages to the pan. Heat through, stirring occasionally. Add the corn and the chopped herbs. Taste for seasoning. Some sausages are quite salty, spicy and garlicky. It's best to season after the sausages have released some of their flavor. Serves 4.

Friday, July 5, 2013

Random Food Fridays - Macaroni Salad


It has been pretty darn hot. Last night, my instant-read kitchen thermometer said that my living room was 90.8 degrees. That's inside, folks. We are often glad we don't have AC. Our energy bills are next to nothing. This recent heat wave sent us out shopping for a portable room air conditioner. For better or worse, they were sold out all over town. Thank goodness, our over night temps finally came down last night. We were able to cool down the house with our whole-house fan and right now, it is a comfortable 72 degrees.

My cousin, Genny, and her family, have an Independence Day tradition of having a road rally. Usually, folks enjoy driving around with the tops down. This time, not so much. We opted out of the road rally this year but attended the BBQ afterwards. My Aunt Barbara and Uncle Larry are fantastic hosts and we had a great time visiting with friends, old and new. This macaroni salad was our contribution to the pot luck. It is yummy, simple, traditional and always welcome. With potato salad, you can go with the sweet pickle plan or the dill pickle plan. Both are delicious. In fact, Barbara makes a famously delicious potato salad on the dill pickle plan. In my humble opinion, traditional macaroni can only be on the sweet pickle plan. Pick a pickle you like because that is the flavor you will get. I used sweet gherkins. Also - please, no pickle relish. Crunchy chunks of pickle are the way to go.


I used my handy V-slicer to quickly shred the carrot, shallot and celery. Sliced olives are drained and added. The pickles are roughly chopped by hand. Save the pickle juice!


Top with the cooked and drained macaroni. Add the sour cream, mayo, mustard, salt and pepper.


Stir and taste. Go easy on the salt on the first round. Many of the ingredients are salty and very little additional salt is needed. After a few hours in the fridge, you may need to stir in a bit more sour cream or mayo to moisten. Enjoy!

Macaroni Salad
1 lb. dry macaroni
2 small carrots
1 shallot
2 ribs celery
3.8 oz can sliced blacked olives
1 cup coarsely chopped sweet pickles
1/4 cup pickle juice
1 1/2 cups sour cream
1 cup mayonnaise
3 tbsp. yellow mustard
salt and pepper to taste

Cook the macaroni in salted boiling water according to package directions. Meanwhile, wash and either grate or chop fine the carrots, shallot and celery. Place in a large bowl. Add the drained olives and the pickles. Once macaroni is cooked, drain and rinse. Add on top of the veggies in the bowl. Pour the pickle juice over the pasta. Add the sour cream, mayo, mustard and salt and pepper. Stir to combine and adjust seasoning. Place in fridge to chill. Fluff the salad before serving. Add more sour cream or mayo if needed.

This makes a lot - enough for a big picnic with some left overs to boot!

Tuesday, July 2, 2013

Saying Good Bye to Grandma Betty


My Grandma Betty passed on May 27. She was 94 years old. She was a pretty amazing woman. She was the foundation of our family for my whole lifetime. Not many people get to be my age and still have a living grandparent. I have been blessed.

Grandma was both an independent woman and a devoted family member. She moved to Sacramento to open her own beauty shop as a young woman in the late 1930's. A pretty big leap from being a farm girl in Tracy. She was set up on a blind date with my grandpa "Pappy" and they married five weeks later! Pappy passed in 1985, at 72, and Grandma lived on her own until she was 90. For many years, we visited Grandma every Monday and had dinner with her. We made this plan because we found out she had gotten up on her roof to clean the gutters! She was almost 80 at the time! My husband and I agreed that she would not likely ask for help, so our plan was to show up every week until she got used to us. Sure enough, she began to save strenuous chores for us because she knew she could just wait until Monday and we could help. From time to time our visits increased - to keep the yard watered in the heat of summer; to change bandages when she had an injury; to take her to the grocery store. I am so happy that we spent time with Grandma! My other grandparents all passed when I was in the intense times of child rearing. After our little girl launched, we had more time to extend ourselves to our elders.

Grandma Betty cared for her elders most of her adult life. Her parents lived in the house where my family has lived and grown. For over 20 years, she made her way to her parents house to care for them. She also provided care and visits for her brothers-in-law. Both her mother and her brothers-in-law lived longer than her own precious husband. As we remembered her at her memorial, we had some laughs because the big things in life only got her down for a moment. She was a deeply practical woman. But, if you did something the "wrong way" (translation not Grandma Betty's way) you would be educated most vigorously! I think as we get older, we all get more set in our ways. After all, her ways had worked for 90+ years!


Grandma was very proud of our girl, Madelyn. Here are Grandma, my mom, myself and Madelyn at Madelyn's undergrad ceremony in Berkeley. It was unusually hot that day, and we were a bit worried about her, but she did great. At that time, she got around pretty good with a strong arm or the help of her cane, but it was such a long day, we rolled her around in style. When I was a young mom, my parents were still hard at work. Grandma Betty always loved to help out. Madelyn told me that one of her favorite memories was of spinning on her bottom on Grandma Betty's coffee table! Grandma, who had the same exact place for EVERYTHING for my entire living memory, would move her belongings aside for a little girl to spin on her fanny. Sometimes, I think she allowed more spaciousness for others than she did for herself. I will always remember her loving kindness and generosity to us. It is because of her that we were able to raise Madelyn the way we did. Grandma Betty, I thank you!


My parents grew up across the street from each other. This meant that a trip to either Grandma's house included a trip to the other's. During the holidays, we always had Christmas Eve at Grandma's house. We would have dinner, open presents, then we would pack it up and go across the street to Grammy and Pappy's house for dessert and more presents. This was the routine for my childhood and also my girl's childhood. As Grandma became more fragile, we helped her to put up her decorations every year. Her tree had those big snow ball lights. It was always beautiful. In Grandma Betty's world, Christmas went up the weekend after Thanksgiving and came down the weekend after the New Year. Like clock work. I'm so glad we could help her and I treasure those memories. One other Christmas ritual was taking the holiday decorations over to the crypts that house her parents and her husband. As long as she was able, she went with either my mom or me and lovingly communed with her ancestors and made sure they were remembered for the holidays. Her urn has now joined them and I will do my best to keep up her tradition.

Grandma Betty, preparing part of the Christmas Eve meal.

I've shared many of Grandma's recipes on my little blog. There are two things I will always attribute to her and they will always be welcome at our family gatherings - Grandma Betty's Orange Jello and Grandma Betty's Square Bottle Dressing. We will be holding a family reunion later this summer and I have been asked to bring the heirloom recipes I've collected. It should be a lot of fun. Bittersweet, but fun. 

Grandma Betty will be remembered by my descendants. My daughter and I will pass her stories down as best we can. During my last conversation with Grandma, I promised that I would never forget her and I would tell all my grand kids about her. 

Along with all the losses of this Spring, there has also been a lot of sweetness for me. Somehow, I feel more grown up. Not only have I been promoted in the family hierarchy, I've also learned that very important lesson - there is always sweetness. As my grief recedes, I realize how hard it has been to be worried about my elder women all these years. Right now, everyone is in safe hands. What will I do? Time to find out.